Five build ideas for connected glass
Build a greenhouse, courtyard corridor, valley bridge, underwater viewing room, or mountain observatory. These five ideas focus on usable layouts, deliberate framing, and sample details you can test before extending a project.
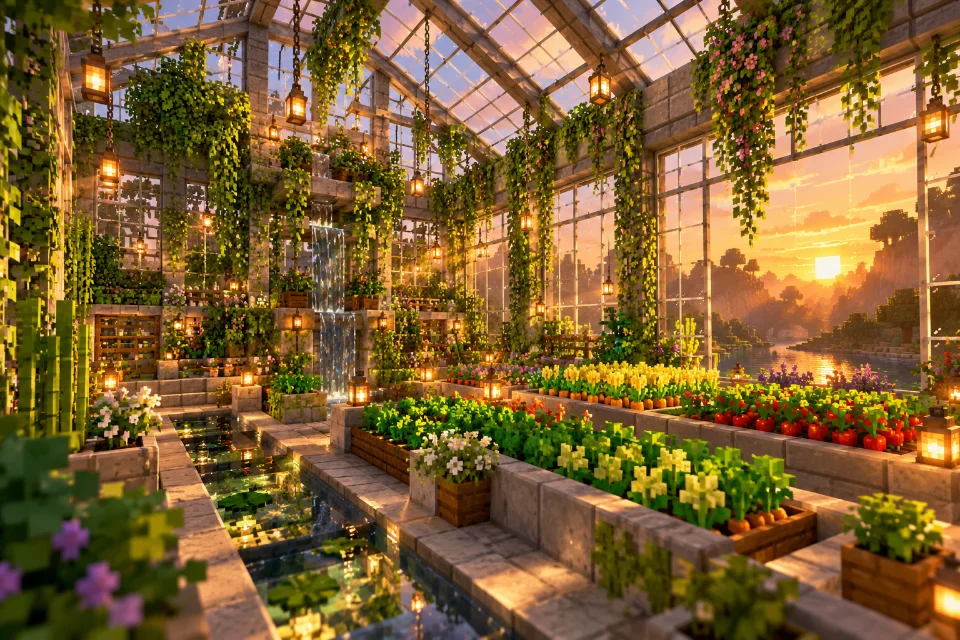
A greenhouse and courtyard
Build a greenhouse with a sloped glass roof, timber beams and planting beds. Leave paths between the beds so the interior feels usable. For a second project, create a glazed corridor around an open courtyard and let plants break up its long sightlines.
A bridge and underwater room
A covered glass bridge can frame a valley without hiding the landscape. Give it strong supports at each end and a simple floor palette. An underwater viewing room needs a secure shell first; remove water inside and test the exterior view before expanding the room.
A mountain observatory
Cut a room into a cliff and place a wide window toward the best view. Put storage against the solid back wall. A recessed opening, shallow balcony and roof overhang add depth. These are design ideas: the final texture appearance depends on the chosen blocks and resource packs.
Start with a common planning method
For each project, mark its footprint using temporary blocks and walk the routes a player will use. Identify where the best view should appear, which areas need privacy or storage, and where the structure meets the terrain. Build one finished sample corner before filling the entire outline. This lets you evaluate the frame, glass, floor, and lighting together while changes are still inexpensive.
Keep a small palette board nearby. Include your chosen glass, a structural material, a floor, and an accent. Compare them in the actual environment rather than relying on an inventory preview. The same palette can feel very different beside snow, dense trees, or a sandy shore. Let the site influence the design instead of forcing every project into the same pattern.
Idea one: a working greenhouse
Lay out planting beds first, then connect them with paths wide enough to move comfortably between rows. Build the frame around those practical routes. A greenhouse looks more convincing when its doors, storage area, and workbench have clear purposes. Keep the roof high enough to read as a separate layer, and use a limited number of structural beams so the transparent surface remains the main feature.
At one end, add a small service area with containers and a water-related decorative feature suited to your build. At the other, create a viewing position that looks down the planted rows. Test the roof junctions and corners with your chosen pack before repeating them. A consistent series of modest bays can be more attractive than a large unsupported-looking dome with awkward transitions.
Idea two: a glazed courtyard corridor
Choose the courtyard shape and planting scheme before enclosing it. The corridor should lead somewhere useful, such as between living quarters and a workshop. Give each destination a clear entrance and avoid a route that forces players to circle the entire garden unnecessarily. Transparent walls work best when they reveal a thoughtfully arranged space rather than exposing unfinished backs of buildings.
Use low planting, a central tree, or a small water feature to organize the view. Keep taller objects away from every window so players can see across the courtyard. Inside the corridor, place occasional benches or decorative recesses without blocking travel. Check the design at night because interior lighting can make the corridor a prominent outline around the garden.
Idea three: a covered valley bridge
Mark the route from both banks and choose landing points that feel natural in the terrain. Build the floor and supporting structure before adding glass. A bridge should look convincing as a crossing even without its transparent enclosure. Give the end supports enough visual weight, then keep the central span relatively simple so it does not compete with the landscape.
A low solid railing with glass above can provide a useful balance between structure and visibility. If you enclose the roof, test the transition into the walls at a sample segment. Walk the bridge from both directions and stop midway to inspect the view. Avoid placing every decorative detail at the same height as the horizon; leave a clear band through which the valley can be read.
Idea four: an underwater observation room
Plan the approach before building the viewing wall. The route into the room should be easy to understand, with a dry transition and enough space to turn around. Construct and test a small secure shell before extending it. Keep the early version modest so you can evaluate visibility, surrounding water, and the location of the main viewing surface without committing to a huge excavation.
Give the room one strong focal view, then use solid walls for storage and lighting. A fully transparent box can reveal more clutter than scenery if every surface competes. Consider a lower solid band and a deeper frame around the main window. Inspect the room from outside as well as inside, and adjust the surrounding terrain so the structure appears deliberately placed rather than accidentally exposed.
Idea five: a mountain observatory
Find a cliff position with a view that changes as you approach. Carve a small entrance passage and let the viewing room open beyond it. This contrast makes the window feel more significant without requiring an enormous structure. Keep practical areas against the rock and reserve the outer edge for the landscape. A shallow balcony or recessed opening can add depth around the transparent wall.
Use the mountain itself as part of the frame. Exposed stone, a modest roof projection, and a restrained floor palette can connect the room to its surroundings. Check the view from below so the building does not look like an unsupported slab attached to the cliff. Where necessary, add a few visible supports that explain the structure without obscuring its main window.
Connect the projects through a shared palette
If several projects belong to the same world, repeat a few materials rather than copying identical shapes. Timber beams from the greenhouse might reappear in the courtyard, while the bridge and observatory share a stone support detail. This makes the settlement feel related without erasing the different functions of each building. Keep the glass treatment consistent where you want those connections to be obvious.
Use paths and sightlines to link the spaces. A bridge can reveal the greenhouse in the distance; the observatory can overlook the courtyard. Plan these relationships while the outlines are still temporary. The strongest visual improvement often comes from arranging what the windows reveal, not merely increasing the amount of glass in each structure.
Test before repeating details at scale
Give each project a small practical checklist before decorating it fully. The greenhouse needs usable planting paths, the courtyard corridor needs clear destinations, the bridge needs comfortable landings, the underwater room needs a dependable approach, and the observatory needs a view worth framing. Check those functions with temporary materials first. Then introduce the final glass and frame treatment. This order keeps the project useful even if you later change packs or decide that one texture does not suit the surrounding terrain. Photograph the completed sample corner and use it as the reference when extending the design. Consistency comes from repeating a deliberate detail, not from making every building identical.
Keep a creative test world or a small sample area containing the corners, roofs, and pane arrangements used by your designs. Revisit it when changing texture packs or updating the profile. Record the working pack order and compare familiar screenshots so you can identify visual changes before editing a finished building. These checks are especially helpful when several projects share the same materials.
Finish by walking each build as an ordinary player. Check entrances, movement, storage, and lighting, then step back to judge the silhouette. A successful project combines a clear purpose with a carefully framed view. Connected glass can support that result, but the proportions, surroundings, and practical layout are what make each of these five ideas feel like a place worth returning to.
Official references
Check current release requirements in the Continuity project listing and Fabric installation documentation.